DIY from the archives: make your own magnetic postage scale
Save yourself some change by using this DIY device to find out exactly how many stamps to slap onto that overstuffed envelope.
You’ve successfully tested the limits of how much can fit into a No. 10 envelope without bursting its seams, but now you’re questioning how much postage you need. Sure, you could just slap a few of the new 44-cent stamps onto whatever you’re sending and be done with it, but that’s good money you’re throwing away.
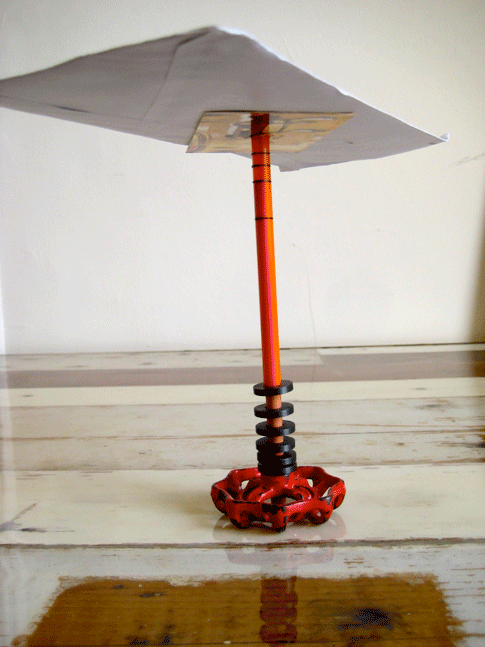
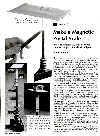
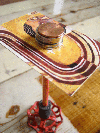
Instead, spend just a few bucks now to build a simple magnetic postage scale, newly updated from an original article in the February 1971 issue of Popular Science. This handy little device works by balancing the unknown weight (your obese letter) against a calibrated opposing force developed by five or six small ring magnets poled to repel each other.
Make a magnetic postal scale
What you’ll need
Although assembling the unit couldn’t be easier, sourcing just the right materials to ensure minimal resistance may take a little time.
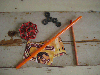
Start with the magnets. Most hardware stores stock a small selection of ring magnets in packages of five or six ($4). Next you’ll need a dowel ($0.75) that barely fits through the hole in the magnets (too much play, or not enough, will cause significant resistance). If you can’t find the perfect size dowel, you can always sand one down or try a colored pencil like I did. Use ultra-fine sandpaper for the smoothest surface possible. The perfect straw is somewhat translucent and is just slightly larger than the hole in your magnet. Almost all (free) straws out there are of the skinny variety, so try juice shops, bubble tea stores or 7-11 for something fatter. I found mine at Dunkin’ Donuts. All other materials you’ll need can be found around the house, including a suitable base and some cardboard. Ready? Cool. Cut your dowel down to 6 inches and your straw to 5 1/4 inches.
Instructions
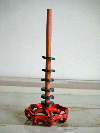
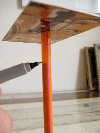
1. A good base has a little weight to it, sits perfectly flat on a table and allows for a dowel to be sunk into it. If using a small block of wood, for example, drill a slightly undersized hole in the center, add a dab of wood glue, and tap the dowel into place. I got lucky and had a few valve handles lying around, one of which my colored pencil fit snugly in to.
2. Next, slip the magnets over the dowel with like poles facing each other. All but the bottom magnet should “float.”
3. To create your weighing platform, cut two equal sized pieces of light cardboard (business cards, cereal box, etc). Make a hole in the center of one that’s the same size as your straw. Now cut four 1/4-inch slits in one end of the straw, and slide it through the piece of cardboard with the hole. Splay the four flaps down so they sit evenly with the cardboard.
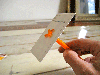
4. Cover the entire surface of the cardboard and straw tip with rubber cement.
5. Place the other piece of cardboard directly on top of the glue. Apply even pressure so that there are no bumps and the straw is firmly held in place. It should be perpendicular to your weighing platform. Now slip the straw over the dowel.
6. Assuming you don’t have a set of laboratory weights, you’ll need some shiny new pennies and nickels to calibrate the scale. A new nickel weighs 5.0 grams and a new penny is 3.1 grams. So five nickels and one penny equal 28.1 grams, which will do nicely for an ounce (28.53 grams). Three pennies plus one nickel add up to 14.3 grams, or very close to a half-ounce.
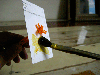
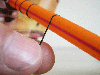
7. Where you see the dowel through the straw is where you should make a small calibration mark with a fine tip pen at 0 ounces, 1/2 an ounce, 1 ounce, and 2 ounces.
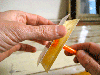
8. Using either an ultra-fine marker or 1/32-inch strips of 1-inch-long electrical tape, make perfectly straight lines at your calibration marks.
9. Once all your lines are marked, the scale is ready to accept weight.
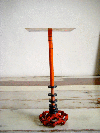
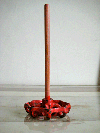
10. When weighing your letters, give them a slight spin to make the weighing platform rotate. This cuts friction between the straw and the dowel so as to give you an amazingly consistent reading. Here we see the dowel through the straw at half an ounce, so we know a single 44-cent stamp will cover it. The USPS provides a handy tool for calculating postage (once you’ve established its weight).