DIY from the archives: a humane bug zapper from 1971
Build an indoor insect trap from our August, 1971 issue, fully updated for today.

Our third updated DIY project from the Popular Science digital archives involves luring and then trapping bugs that have managed to find their way inside your house—a truly universal problem. Follow along as we update a circa-1971 trap for today’s smarter, more intelligent insects for less than $20.
A bug trap you can make
What you’ll need

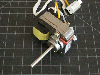
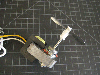
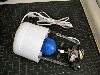
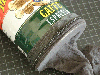
The motor (pictured below) can be any small 10- to 20 watt, 120-volt AC motor that runs at 1,500 to 3,000 rpm. Old record players or small fans are a good source for these. If you can’t find anything lying around or at a thrift store, purchase a new small desk fan for around $10.
Instructions
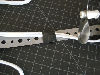
1. Use the base of the coffee can to create the propeller. Make it 1 inch wide at its widest point and 3 inches long (assuming your coffee can is 4 inches in diameter).
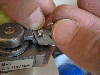
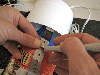
2. Attach the propeller to the shaft of the motor using glue, rubber bands, or, if it’s threaded, washers and a nut. In this example I was able to utilize part of the fan’s original plastic blades for a more precise fit. The less movement you have in the blades, the more efficiently (and quietly) they will move the air. Once secure, bend the fan blades so normal rotation of the motor causes downward air flow. The blades’ pitch should be 30 to 45 degrees.
3. Form the motor and lamp support bracket from perforated pipe-hanger iron. Lay out your fan and light bulb (in socket) as a measuring guide. The width of your bracket should be the same as the interior or your coffee can. Its height should allow for 1/2- to 1-inch clearance between the bulb and the fan blades.
4. Attach bracket ends to the motor, using the screws holding it together.
5. Attach about a foot of lamp cord to the motor and tape up any exposed wires to prevent electrical shorts.
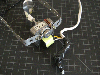
6. Tape the lamp cord halfway up on the inside of the bracket, and make sure it’s clear of the fan blades.
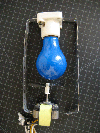
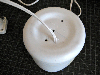
7. Cut the cover from the bottom of a bleach jug that is slightly wider than your coffee can. The height of your cover should allow for the light bulb to be exposed 1 1/2 to 2 inches. Once your cover is cut, place the socket on top and mark where the bolt holes will need to be drilled.
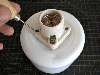
8. You will also need a hole in the center for a hook eye, and one for the outlet cord to enter.
9. Attach both the motor wires and the outlet cord to the lamp socket.
10. Install two 3/4-inch bolts and a hook eye through the top of the cover.
11. Line up the bracket and the socket over the bolts, then tighten them down with nuts.

12. Screw in the bulb. Pretty straightforward.
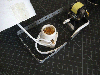
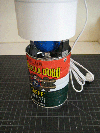
13. Slip the coffee can up over the motor and fan so that the blades are just below the surface. Use extra pipe-hanger iron to determine where holes should be drilled. Be sure not to place the screws where the fan blades will knock into them.
14. Check that everything is solidly tightened-down, and test the unit to make sure the fan blades spin clear of all screws, the cord, and the bracket.
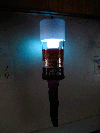
15. For the bag, cut out an 18-inch-long section of undamaged pantyhose. Tie a knot in one end, turn the bag inside out and slip it over the end of the coffee can.
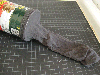
16. Use a strong rubber band or piece of elastic to secure the bag onto the can.
17. You’re ready for bug season. Now get out there and have some fun.