PopSci DIY: a newspaper baler, updated from the archives
Streamline your environmentalism with this easy and inexpensive project.

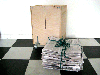
For the eight of us still reading a daily newspaper, compiling the week’s news into a recycling bundle that’s able to withstand the journey from kitchen to recycling bin fully intact is a battle of wits, strength and patience. Okay, I’m being dramatic, but wouldn’t it be nice to have a simple contraption to make the job oh-so-much simpler? That’s what the editors of Popular Science were thinking back in June of 1971 when they provided readers with just such a contraption.
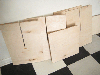
Re-creating (and updating) this newspaper baler is actually quite easy, thanks to the detailed diagram provided with the 1971 article. All you need is a single 4-by-4-foot sheet of 1/2-inch plywood ($15), a handful of other inexpensive materials ($24), and an afternoon of your time.
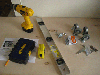
Tools and materials
Instructions

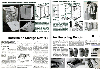
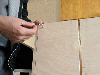
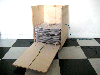
1. Print out this original illustration (above) from the 1971 Popular Science article and use it as your blueprint during construction.
- Note: Your bottom piece of wood should be the size of your folded newspaper, plus a 1/2-inch on each side. All other measurements will be determined based on the size of the bottom piece.
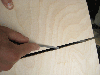
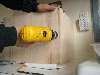
2. Rasp or file the 1/4-inch slits for twine, making them as smooth as possible so you won’t battle with splinters down the road.
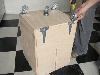
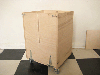
3. Once all your pieces are cut and edges are smooth, you’re ready to assemble.
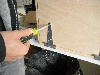
4. Although the original article suggests using glue and nails to attach the pieces of wood, I’ll always argue for the strength and durability of screws (especially considering the abuse this unit might take). If you go the screw route (#8 wood, 1 1/4 inches long ($5)), be sure to pre-drill the holes and countersink the heads for the smoothest, most professional finish. Three screws per edge will be sufficient.
5. Once the bottom and sides are together, attach the front piece using two 2-inch T-hinges ($3), screwed into the base.
6. Ball bearing swivel casters ($14) are optional, but wheels make things a lot easier if you’re storing the baler in a closet or pantry.
7. Secure the door and allow for easy access with two simple eye-and-hook latches ($2), mounted near the top.
8. Assembly is now complete, but the baler’s not quite ready to accept newspapers.
9. Place two equal lengths of twine, tied at their centers, in the middle of the baler. Each string end should then exit the baler through one of the four slits.
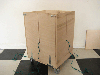
10. Tie the twine ends out of the way until you’re ready for binding.
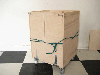
11. Once the baler is full, unlatch the front panel and swing it down for easy removal of the newspaper stack.
12. Finally, tie the four twine ends down and remove your newspaper bundle.