Make a master remote
Make a device that lets you easily operate almost any appliance in your house using your TV remote.

We may earn revenue from the products available on this page and participate in affiliate programs. Learn more ›
This story has been updated. It was originally featured in the November 2008 issue of Popular Science magazine and involves outdated technologies and services. For current advice, check out our product review team’s picks for the best smart lights and the best smart light bulbs, as well as our regularly updated stories about how to choose the right smart light for your home and what to do if your WiFi and smart home don’t get along.
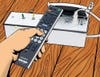
So you’re ready to settle down on the couch in front of a good movie. Wait, there’s still work to be done: Turn off the lights, make popcorn, maybe even mix some drinks in the blender. No, don’t get up—just use a home-built receiver box that lets you turn any household appliance on and off with your TV remote. For example, plug a lamp into an outlet on the box (we’ve dubbed it the Zapper), program one of the remote’s little-used buttons to control it, and the next time you want to watch Halloween VI, you’ll barely have to lift a finger to set the mood.
Stats
- Time: 2 hours
- Cost: $38.50
- Difficulty: easy | | | | | hard (Editor’s note: 3/5)
Parts
- Programmable IR receiver SIS-2 (SparkFun Electronics #SEN-08753; $9.95)
- 38KHz IR receiver (Mouser #638-IRM-8601S; $1.24)
- 2N2222 transistor (Mouser #610-2N2222; $0.46)
- 47-ohm resistor (Mouser #291-47-RC; $0.10)
- 47µF electrolytic capacitor (Mouser #647-UVZ1V470MDD; $0.10)
- 2 (150-ohm) resistors (Mouser #291-150-RC; $0.20)
- 1N4001 diode (Mouser #512-1N4001; $0.06)
- 0.1µF ceramic capacitor (Mouser #581-5ZH104MACJI; $0.16)
- Yellow LED (Mouser #859-LTL-4253; $0.11)
- 2 SPST 5VDC relays (Mouser #655-T90S1D12-5; $4.98)
- 2 SPDT toggle switches (Mouser #108-0009-EVX; $4.08)
- SPST pushbutton (Mouser #107-3044-EV; $1.86)
- 5VDC wall adapter (SparkFun Electronics #TOL-08269; $5.95)
- DC barrel power jack (SparkFun Electronics #PRT-00119; $1.25)
- 125VAC/15A household outlet (local purchase; $1)
- 2 rectangular electrical boxes (local purchase; $3)
- 2 box covers (local purchase; $3)
- 6-foot indoor extension cord (local purchase; $1)
Instructions
1. Download the IR-receiver data sheet from www.simerec.com.
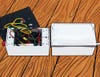
2. Snip the receptacle end off an extension cord. Bend two scrap wires into a “Y” and connect that to a wire from the cord. Connect the two arms of the “Y” to the socket and wall adapter that go inside the Zapper. Connect the cord’s other wire to the adapter, which provides 5 volts for the IR receiver and relays.
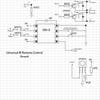
3. Follow the schematic above to assemble the IR-receiver circuit, switches, and relays.
4. Fit all the parts into the electrical boxes.
5. Plug the box’s cord into the wall. To program, point the remote at the box and hit the button you want to use, following the sequence in the data sheet.
6. Plug appliances into the outlets. Press the first programmed button to turn the first outlet on, and again to turn it off. Repeat with the second button and outlet. To operate the appliance, leave its power switch on.