Make an iPod video projector
Cut down on the squinting by beaming the image on your iPod’s screen onto a wall.
We may earn revenue from the products available on this page and participate in affiliate programs. Learn more ›
Sometimes, when you’re trying to immerse yourself in a movie or television show on an iPod’s diminutive screen, you just need to go bigger. Here’s how: Turn your Classic or Nano into a home theater with a simple, unpowered DIY projector.
All you need is a mirror, some cardboard, and lenses harvested from an old slide projector. Set up your portable iPod projector in a dark room, and the images from the iPod’s screen will be reflected through the lenses, creating a roughly 5-by-7-inch picture. Then grab some Milk Duds and kick back with a downloaded movie or the latest episode of The Daily Show.
Stats
- Time: 30 minutes
- Cost: $25
- Difficulty: easy | | | | | hard (Editor’s note: 2/5)
Materials
- iPod
- Lens tube and lens housing from an old slide projector
- Small makeup mirror
- Cardboard
- Hot-glue gun
- Tape
Instructions
1. Open the slide projector and remove the lens housing (the plastic box containing the tube with the lenses).
2. Heat up the glue gun, and affix the mirror to a piece of cardboard so that it sits at a 45-degree angle relative to the lens.
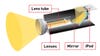
3. Make a cardboard enclosure for the mirror and the lens housing. Leave a hole above the mirror for the iPod screen, and cut a slot narrow enough to hold the iPod in place. Cover the box in black electrical tape so that no stray light gets in or out.
4. Turn the lights down, fire up the iPod, and set the brightness to max. Adjust the focus by turning the lens tube until you get a sharp image.
This story has been updated. It was originally featured in the July 2008 issue of Popular Science magazine.