Mod it: the incredible two-headed AVR programmer
Make this $1.50 mod and create a universal AVR programmer.
If your DIY tinkering tends to lean toward the programming side, there’s a good chance you’re familiar with AVR microcontrollers. There’s also a good chance you may have been confused when, right out of nowhere, Atmel (the company that designed the AVR family) changed the AVR in-system programming (ISP) interface from 10 pins to six. Even worse, Atmel’s terrific USB ISP programmer, the AVRISP mkII, uses only the modern six-pin interface. No legacy support for your older AVR-related hardware here, folks. So what’s a poor budding AVR programmer to do?
Create a two-headed AVR programmer with legacy ISP support. That’s what!
Lest you think that 10-pin ISP interfaces are a thing of the past, check out the fantastic product lineup from Olimex. The 10-pin ISP interface is alive and well, thank you very much. So, an AVR programmer that can handle the modern Arduino 0010 Diecimila and the Olimex AVR-MT would be a versatile tool, indeed.
If you don’t already own the AVRISP mkII, you can purchase one for around $36. Regardless of whether you already own a Mark II or purchase a new one, this simple mod only requires one low-cost part for enabling you to program any ISP AVR.
My Mark II is busted
Wow, what a gaff. Atmel manufactured some Mark IIs (between October 2007 and January 2008) that can’t program a target ISP AVR. If you own one of these cranky ISP programmers, rush to Atmel for a free firmware update release that will fix your broken programmer. Now your Mark II should work.
- Time: 1 hour
- Cost: $1.50
- Difficulty: easy
Parts
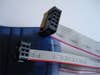
- 2-by-5-pin IDC ribbon cable (SparkFun Electronics #PRT-08535; $1.50)
- Atmel application note AVR042: AVR Hardware Design Considerations (free)
Instructions
1. Download Atmel application note AVR042. Refer to Page 5 for connecting our 10-pin cable to the Mark II’s six-pin header.
- Note: The web is rife with wrong wiring connections for the 10-pin interface. Use this Atmel application note and you won’t have any troubles.
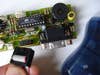
2. Carefully snap apart the AVRISP mkII plastic shell. Release the two plastic ears that hold the PCB in place and lift the board out of the plastic shell. Identify the six-pin ISP header and turn the PCB over. The underside of this six-pin header is where you will be soldering the 10-pin ribbon cable.
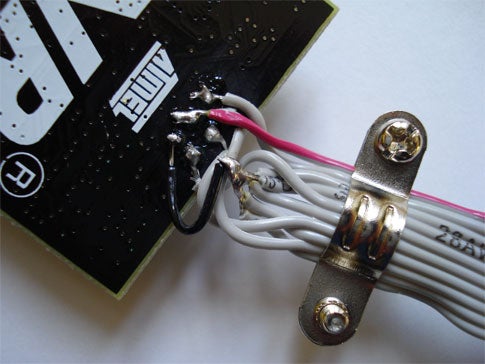
- Pro tip: On the underside, pin 1 is identified with a square.
3. Snip one of the headers off the 2-by-5-pin IDC ribbon cable. Carefully, separate each of the 10 wires; about 1 inch of length will do. Strip, twist, and tin each wire.
4. This step is critical—take your time. Identify wire 1 from the 2-by-5-pin IDC ribbon cable. This is MOSI for the 10-pin ISP. Pin 4 on the six-pin Mark II interface is MOSI. Locate this MOSI pin on the underside of the six-pin interface of the Mark II. Remember the six-pin interface is upside down. Make sure you have correctly located pin 4, and then solder wire 1 to the underside of the Mark II PCB’s six-pin interface. Got it? Read this step over a couple of times, study the application note diagram, then make the connection.
5. Repeat the same ID process for each of the remaining nine pins of the 10-pin interface. Connect wire 3 of the 2-by-5-pin IDC ribbon cable to ground. Also, wires 4, 6, 8, and 10 are all connected to pin 6 of the Mark II six-pin interface. These are ground (GND) connections. I used a black extension wire to bundle all of the GND wires together prior to soldering just the extension wire to the Mark II GND pin 6.
6. Check all of your solder connections with a multimeter, then refit the PCB into the plastic shell, feed both the six-pin ribbon cable and the 10-pin ribbon cable out through the slot in the Mark II plastic shell and snap the case back together. It’s a tough fit, but once the case snaps together it’s a sweet mod.
7. Try to program an AVR from within the free AVR Studio 4.13 (build 528) environment with the 10-pin ISP connector on an Olimex AVR-MT PCB (or, choose another 10-pin ISP dev board). It should work without a hitch.
Enjoy your incredible two-headed AVR programmer.