Scare tactics
Motion-triggered monster heads, a witches' brew of liquid nitrogen, a projector rigged for fright, and more. Our favorite high-tech haunting tricks made easy.
This story has been updated. It was originally published on September 26, 2006 and involves outdated technologies and services. Although you may still be able to put these decorations together if you happen to find the right gear and have the right skills, you’ll likely be better off trying one of PopSci’s more recent projects. Consider five ways to use science to spice up a Halloween costume, wooden Jack-o’-lanterns, homemade Halloween candy, and even three ways to reuse old cloth face masks in a costume.
The bubbling cauldron
Want a real witches’ brew? Mix soap-bubble solution with dry ice, or use liquid nitrogen for bubbles that release fog when they pop. In the following video, PopSci‘s contributing mad scientist, Theodore Gray, uses the help of a few young assistants to create cauldrons of toil and trouble.
There are many ways to make a bubbling cauldron of witch’s brew. As with all magic, some preparation is required for the spell to work properly. The three most practical methods for creating a bubbling cauldron are:
- Liquid nitrogen
- Dry ice
- Mechanical injection of compressed air or, preferably, helium

All magic potions begin with hot water. If you don’t have a fire under your cauldron, it’s OK to just fill it with hot water from the tap—the hotter the better. To this, add magic-potion ingredients such as chili powder (for its blood-red color), cayenne pepper (for its strong magical smell) and any other spices, herbs, dried leaves, sticks, bones, wolfsbane, or eyes of newt you may have lying around. You can buy chili powder and other items in bulk quite inexpensively at warehouse clubs.
If you want overflowing bubbles, add several good squirts of dishwashing liquid. For some reason, regular (non-Ultra) Dawn is renowned in the bubble industry as the best for producing suds.
A note on cauldrons: Cast iron is the proper material for cauldrons, but for the potions discussed here, pretty much anything will do. Plastic buckets, cooking pots—anything that will hold at least a few gallons of water is fine. Your cauldron should be about half full (or half empty, depending on how you look at it).
After mixing up the stock (cragged sticks and 6- to 10-year-olds are best for mixing), you’re ready to add the magic.
Liquid nitrogen, available from any welding-supply shop (provided you have a certified transport Dewar to carry it in), is by far the most dramatic bubble maker. A few quarts of it dumped rapidly into a cauldron of hot, soapy water can create a billowing tower of bubbles several feet high in an instant (stand back). Much fun is had by all, but it doesn’t last very long.
Warning: Theodore Gray is a scientist trained in lab safety procedures. If you do not have the knowledge or safety equipment to handle liquid nitrogen, dry ice, or helium, do not attempt this project.
Dry ice is much easier to get. Some larger grocery stores and supermarkets actually sell dry ice from chests just like the ones selling regular ice. Call around to find a place that sells it. I don’t know if it’s unique to my town, but where I live, you can also buy dry ice at the blood bank, which is particularly appropriate for Halloween. Ten or 15 pounds should be plenty, and it costs about $1 per pound. Bring it home in a cooler, and use within a day. (Do not try to store dry ice in a freezer. Your freezer is boiling hot compared to the dry ice, which will last longer left alone in a Styrofoam cooler.) Do not lick the dry ice, and handle it with gloves at all times.
Use a hammer to break up the block of dry ice, and add about 5 pounds at a time to the cauldron. It will bubble gently for quite a while, the bubbles full of spooky smoke. If you have soap in the brew, it will slowly bubble over and spill out in a most satisfying way. If the water gets cold, add hot water.
The last, and most complicated, method of bubbling a cauldron involves injecting compressed air or other gas using a coil of copper pipe with small holes drilled in it. Air from a compressor works great if you want a basically unending stream of bubbles overflowing the cauldron and making a gigantic mess (which is, I should remind you, a good thing if you’re six).
But the ne plus ultra of bubbling cauldrons is, without a doubt, the helium-bubble cauldron. The same copper-pipe bubbler can be connected to a regulator attached to a commercial helium cylinder (available at the same welding-supply shops you get liquid nitrogen from, and from party-supply stores, though they will not have the right regulator). Turn the helium on just fast enough for the bubbles to rise about 1 or 2 inches per second.
Any child who has not seen this before will be absolutely floored by it, as will many adults. Do note: It does not work very well in high winds, and the more you stir or otherwise mess with the bubbles, the less well they float. It’s best to leave them alone or just slice them off when you think they are ready to go free. (Just try to enforce that rule once the kids get involved.)
Also note that this is an expensive hobby: A full 240-cubic-foot tank (the largest commonly available size) will last about 15 minutes and cost about $80 to fill.
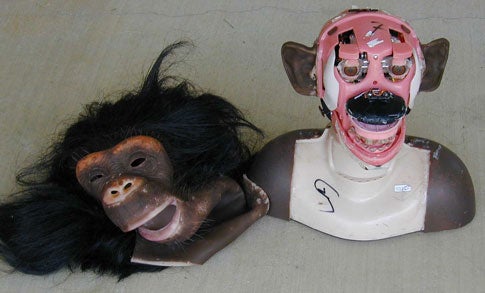
The evil-eyed monster: skinned-alive robotic chimp

Looking for that little something extra for your Halloween party this year? Don’t just carve another boring pumpkin. Instead, try skinning a WowWee chimpanzee animatronic for a Terminator-style head that screeches and cackles and follows you with its eyes.
- Cost: $190
- Time: 4 hours
- Difficulty: moderate
Parts
- WowWee chimpanzee animatronic head ($160)
- LEGO Bionicle Voice Changer Helmet ($20)
- 2 pairs of black pantyhose ($10)
Instructions
1. Remove the fright-wig “skin” from the outside of the chimp.
2. Insert the microphone from the voice-changer helmet into the chimp’s mouth.
3. Embed the LED clusters from the helmet in front of the chimp’s eyeballs.
4. Fix everything in place with cable ties.
5. Pull two pairs of black pantyhose over the chimp’s head.
More customization
Make your little monster mobile by mounting it to an iRobot Roomba. Specifically, you’ll want a Roomba equipped with Mind Control, from Element Direct. This little device plugs into the Roomba Open Interface and enables you to write your own Roomba-control program, giving you complete access to Roomba’s sensors, motors and speaker.
The wailing corpse
Morph a flimsy fake skeleton into a mass of hideous rotting flesh with the Corpsification Kit ($35) from Gore Galore. Then soup up your dead guy with Chips International’s Halloween Howler/Superseller ($50), a wallet-size gadget that lets you record up to 20 seconds of creaks and moans and then plays them back when triggered by a motion sensor. End result: perfectly timed sounds and petrified visitors.
The battery- or AC-adapter-operated Superseller comes with a line-in jack and onboard mic for recording, a line-out for amplification, and a reset timer to keep the shrieks from getting repetitive during high-traffic times. Sound effects can be retained indefinitely without power, and a swivel-type mounting bracket makes temporary installation easy. Ready for fright night?
A screaming head
- The scare: An evil laugh, scream or other spooky effect blares automatically when your victims pass by a particular spot.
- The gear: Mac, wireless music streamer such as AirPort Express, webcam, small set of powered computer speakers.
1. Record or download scary sound effects (you can find plenty on YouTube) to your laptop. Stash it out of sight, and turn off the screen.
2. If your webcam doesn’t already have motion-detection software, download EvoCam ($25). Mount the cam in a corner near the ceiling, pointing at the spot you want to trigger the sound.
3. Hide your speakers on a shelf or inside a mask, and connect them either to a music streamer or directly to the computer.
4. Use this script with the motion detector software to tell iTunes to play a song or playlist when the camera senses motion. Make a playlist from a series of sounds, and space them out with silent tracks. Use multiple sets of speakers and webcams to extend the scare to other rooms.