Shoot from the sky
Modify your old digital camera to take a pic every few seconds until it's full, then send it up on a kite.

I’ve long been tempted by the expensive hobby of kite photography but could never bring myself to blow thousands of dollars on dedicated gear or take the time to build complicated trigger systems. As an early adopter, though, I have plenty of old digital cameras lying around. I realized that if I could get one to shoot automatically, I could attach it to my kite and send it airborne.
- Dept: Void Your Warranty
- Tech: auto-trigger cameras
- Cost: $1.50
- Time: 1 hour
- Difficulty: dabbler | | | | | master (Editor’s note: 4/5)
The key to hacking a camera to fire continuously is a $1.50 chip from RadioShack called a LM555 Precision Timer. It works by intercepting power from a source (batteries, for example) and releasing it at steady intervals. The chips are used to create time delays in devices such as oscillating fans and traffic lights, usually with a resistor and capacitor to control the timing.
I didn’t want to bother with those extra parts, so I wired it unconventionally, using the chip’s internal circuitry to pulse the signal. It triggers the camera’s shutter about once a second, but because my old camera takes a few seconds in between shots, I get about 800 photos an hour on a 64MB SmartMedia card shooting at 640-by-480 resolution.
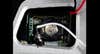
For the kite mount, I used a bent coat hanger and some string. This didn’t give me much control over the camera’s aim, but the unpredictability of the shots is part of the fun, and since it’s digital, I’m never wasting film. For more advanced mounting solutions, check out University of California, Berkeley architecture professor Charles C. Benton’s site.
Now that I’ve satisfied my kite jones, I’m experimenting with other places where continuous shooting might produce cool results, including hanging a small camera from my dog Willie’s collar for a puppy’s-eye view of the world. (Editor’s note: See Phil’s site for Willie’s pics.)
Hacking the cam
I modified an old 1.3-megapixel Olympus camera, but these steps should work with any model as long as you can find the shutter and battery contacts, which may be trickier in smaller cams.
1. Take the back off the camera and find the red and black wires connected to the battery contact points. Solder same-color leads to these points.
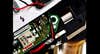
2. Pop off the shutter button, and you should see two or three solder points—touch each with the black battery lead you just soldered to figure out which one makes the shutter fire.
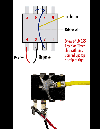
3. To wire the chip, solder the black battery lead to pin 3 and the red to pin 4. Solder pins 2, 7 and 6 together with a small bridge wire. (I removed pins 1, 5 and 8 to make it easier to solder the other pins.) Solder a wire from the bridge connecting the pins to the contact point that triggered the shutter.
4. Reassemble the camera. It will start shooting as soon as you turn it on and will keep going until the memory card is full.
This story has been updated. It was originally featured in the December 2004 issue of Popular Science magazine.