Build your own drawer organizer
No more rummaging around for those measuring spoons you swore were in there.
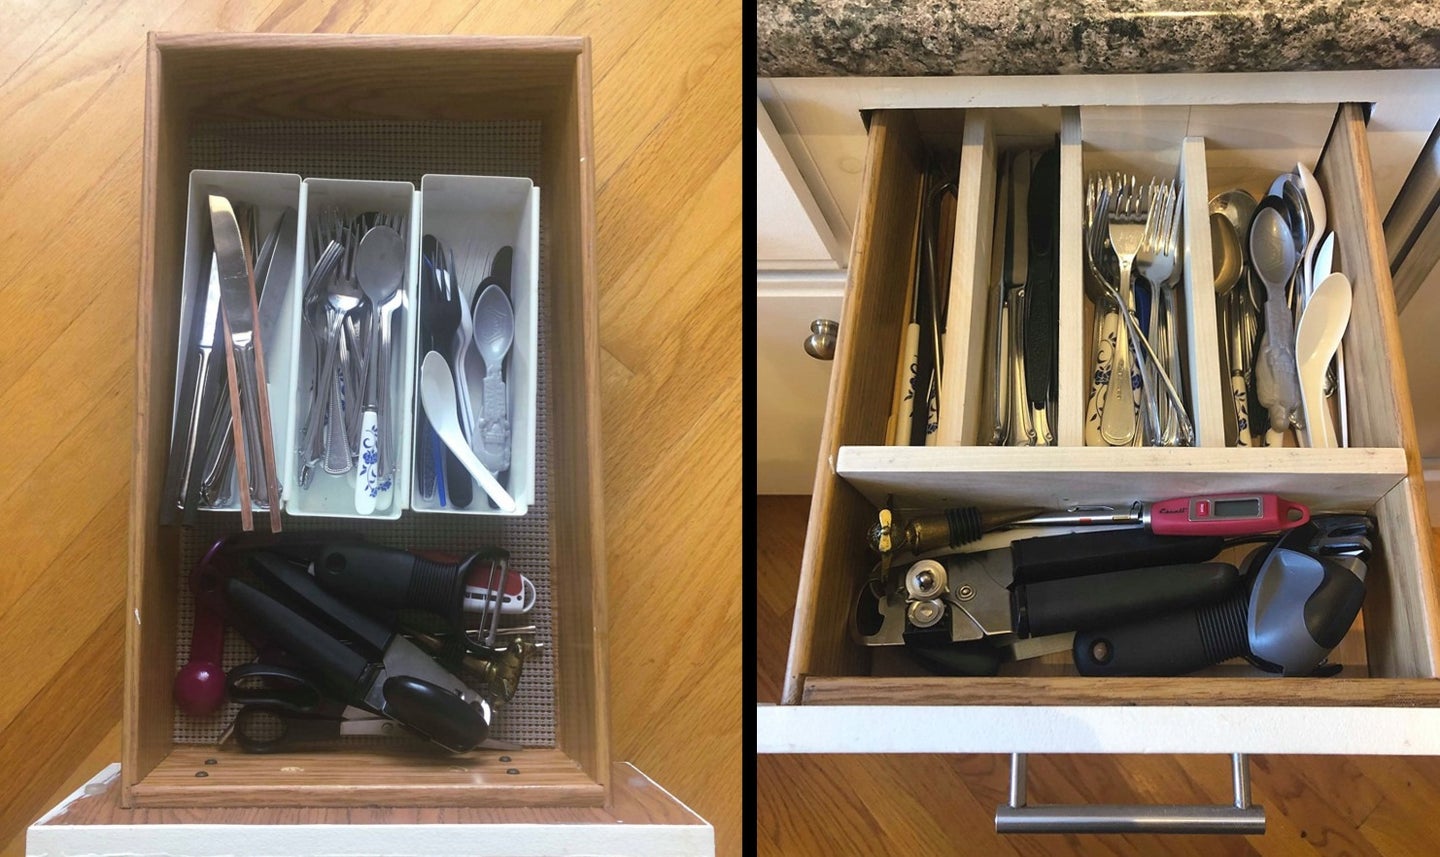
Think about your kitchen drawers. They’re probably a mess. Even if you purchased some drawer organizers, they weren’t built for your particular drawers or all the stuff you’ve managed to shove in them. To truly maximize your storage space and keep your stacks of utensils looking tidy, you’ve got to build your own.
When you’re done, you’ll have a sturdy drawer organizer that will easily slide into and lift out of the drawer you built it for. That means easy cleaning (and removal if you’re renting your place).
Stats
- Time: 2-3 hours
- Material cost: $20
- Difficulty: moderate
Materials
Tools
- Measuring tape
- Pencil
- Paper
- Masking tape
- Square
- Clamps
- Eye protection
- Circular saw
- Coarse sandpaper
- Hammer (or brad nailer)
- Thick work gloves (optional)
Instructions
Plan your drawer organizer
1. Empty your drawer. Easy. Makin’ progress.
2. Measure any dead space in the back of your drawer. Most drawers won’t pull out all the way, so that space in the back can easily become the land of lost spoons and corn cob holders. It’s important to know your drawer’s limits so you can prevent utensils from disappearing back there. Simply pull your drawer out as far as it will go and measure the distance from the back of the drawer to open air.
3. Take your drawer out. Don’t try to do this project with your drawer still installed. It’ll be a nightmare. The proper removal process will vary, so if you’re not sure, pull it as far out as you can and look at its tracks to discern the best course of action. Mine, for example, came out after I lowered its front end toward the floor.
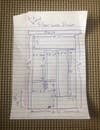
4. Start sketching. Draw a picture of your drawer on a sheet of paper. Make sure it’s large enough to clearly show the dimensions of your existing drawer and the organizer you’re building. You’ll add to this throughout the project—it’ll be much easier than trying to remember everything.
5. Measure your drawer. It should go without saying that if you build something too big, it’s not going to fit, and if you build something too small, it’s going to be useless. You’ll want to know length, width, and height.
6. Organize the drawer’s contents. For a truly efficient use of space, put everything you’re planning to store in the drawer back into it. Try to envision how you want it to look and how everything will fit. In my case, I put long, thin items together (chopsticks and metal straws), and then grouped butter knives, forks, and spoons into their own sections. I also kept a large space at the front of the drawer for bulkier items like scissors, a can opener, and a knife sharpener.
7. Plan a layout. Once you’ve got an idea of how you want everything stored, stick masking tape to the bottom of the drawer to roughly mark the location of each section divider. You can use pretty much anything flat and straight for this—it’s temporary, anyway.
8. Measure the layout. Now it’s time to get specific. Figure out how long and wide you want each section to be. You’re not building a box within your drawer, so there won’t be poplar at the front or sides of the organizer—any sections there can run right up to the drawer’s existing walls. The only exception is if you’re not planning on having a horizontal section at the front of your drawer. Then, you should put a horizontal piece of poplar right at the front. You should construct a back wall, too.
- Tip: It’s important to remember that each divider will be 1/2-inch thick, so consider that in your measurements. It’s easiest to do so on paper, so sketch everything out. Once everything adds up correctly, move on.
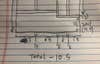
9. Think about depth. Yeah, you measured the depth of your drawer, but have you really pondered it? If it’s any more than two inches deep, it might be hard to reach the bottom of certain sections. I settled on a height of 2 inches for all vertical dividers and drawer height (3 1/2 inches) for all horizontal ones. That’d make it easy to access all my eating utensils, while preventing them from sliding into the no-man’s land at the back of the drawer.
Cut the wood
10. Set up the lauan. You can use pretty much any thin plywood with a finished side for the drawer organizer base, but lauan is a solid low-cost option. Plus, it’s light and strong, so it won’t weigh down your drawer—it’s often used for drawer bottoms anyway. Try to avoid using standard plywood, which has a rough appearance. One side of the lauan will usually look better than the other, so choose the side you want facing up. If they’re both about the same, pick the surface that bows up a little—the weight of your utensils will flatten it over time.
11. Measure the lauan. Once you’ve decided on a top side, flip the lauan over and mark the length and width of the drawer. The wood may splinter up as you cut, and keeping the back side up should prevent any damage to your preferred surface. If you start in one corner of the board, you’ll only have to make two cuts.
- Tip: When you note each measurement, don’t try to draw a straight line. Simply place your pencil at the proper point and draw short lines to either side, forming a “V”—the accurate measurement will be where those two lines touch.
12. Draw your cutting lines. Use the square to connect your marks with straight lines. If your square is not big enough, you can use another long, straight object, but you should use the square as much as possible. I used my uncut poplar boards. Check your measurements before moving to the next step.
13. Position the lauan. You’ll need a flat space for this, so if you don’t have a workbench, set one up (it can be as simple as a sheet of plywood laid across two sawhorses). If you have a table saw, even better. If you only have a hand saw, you’re going to hate this. Clamp the lauan to your work surface so it doesn’t move as you cut, and make sure one of your cutting lines is hanging over empty space. Don’t skip the eye protection—splinters and sawdust are going to be flying everywhere, and you won’t want them in your eyes.
14. Cut the lauan. Place your circular saw flat on the wood, the blade a short distance away from the edge. Make sure you’re standing to the left side of the saw so if it kicks back, it doesn’t cut into you. Your saw will have its own guidance system (a notch, or even a laser), so line that up with the line you’re about to follow. Pull the trigger and make the cut.
15. Reposition the lauan and make any additional cuts. Just repeat steps 13 and 14.
16. Cut the poplar. If there are any pieces of poplar you need to cut only for length, not width, do those first. Of those, cut the longest pieces first. Measure the first piece, hang it over the edge of your work surface and clamp the board in place. Then, cut. Repeat this process for any subsequent cuts that require you to cut across the board, not down its length.
- Tip: Don’t try to measure each piece along the board and cut them all in one go—the saw blade has a width, too (about 1/8 inch), and you’ll find your pieces getting progressively smaller if you’re not measuring and cutting each piece individually.
17. Prepare to rip the poplar. Now it’s time to cut down the length of your poplar pieces, and these will be the hardest cuts you make during this project. They’re easy if you have a table saw, but slightly more complicated if you don’t. You’ll want a manageable length of wood—depending on your setup, anything longer than three or four feet is going to be unwieldy. I managed to rip individual 8- and 10-inch pieces down to 2 inches wide, but it’s more efficient to do one long rip if you have the space. Mark one end of the piece you plan to rip, then the other, and connect them with a straight line.
18. Set your saw blade depth. If you haven’t set the saw blade depth yet, you absolutely must do so here. Unplug the saw, set it atop the wood you plan to cut, and adjust the blade until the lowest teeth are about 1/4-inch below the bottom of the board. Plug the saw back in.
- Tip: This is important because if you have to cut through something else while ripping (such as a sawhorse or a workbench), pulling the blade up as much as possible will minimize both resistance as you cut and damage to what’s underneath.
19. Rip the poplar. As I just mentioned, you might have to cut into your work surface during this step, so if you’re not comfortable with that, you’ll need to find somewhere else to work. If you’re using wooden sawhorses, simply nail the ends of the board into each one, making sure the nails are in the part of the poplar you don’t plan to use. If you’re using metal sawhorses, clamp the wood in place. Line your saw up along the cutting line, pull the trigger and slowly move it down the length of the board.
- Safety tip: If at any point the board you’re ripping starts to feel unstable, stop cutting and make sure everything is securely in place before starting again.
20. Sand all edges. Your saw may have left some fuzzy, or even splintered, edges on the pieces you cut, so you’ll want to smooth those down. Don’t just hold the sandpaper in your hand, though—those splinters can easily jab through the paper and into your skin as you’re sanding. No good. Instead, find a scrap of wood or some other material that you can wrap the sandpaper around, making it resemble a sponge. You can use thick work gloves, too. Now, hit all the edges of your cut pieces of wood (even the sides you didn’t cut, just to be safe). Once they’re all smooth, you can move on.
21. Make sure the lauan fits. Before you continue, slide one end of the lauan into the empty drawer, making sure you don’t let go of the other side. Test each side to ensure a snug fit, but don’t let the whole piece fall into the drawer, or it’ll be hard to get out. If any side is too big, either sand the edge down a bit more, or trim it with the saw.
Build your drawer organizer
22. Prepare to nail the back board. Starting from the back (because if you start slow, it’s better to mess up where people won’t see it), figure out how the pieces that touch your back board are going to line up against it. Lightly pencil any measurements onto the back board so you’ll know exactly where the pieces will be, and make sure they’re visible on both sides (you can erase them later). You’ll want them on both the board side for proper alignment and the nailing side for accurate fastening. You can even put dots where the nails should go—one on the top, and one on the bottom—for extra precision.
23. Nail the back board. Take the piece the nail isn’t going into first and clamp it to your work surface. Make sure it’s tight. You may want to use a scrap piece of wood as a buffer between the clamp and your divider, to prevent any damage. You can also put a clamp on just the work surface just behind the clamped piece to stop the wood from sliding away from you. Once you’re comfortable it’s secure, line up the back board and tap the nails in. Repeat this step for any additional pieces.
- Tip: When I say, “tap,” I mean it. Let the weight of the hammer do most of the work. The wood is thin and the nails are small, so overdoing it could crack the wood or bend the nails.
24. Repeat steps 22 and 23 for any other horizontal pieces in the middle of your organizer.
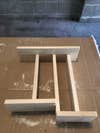
25. Nail the front board. By now, your organizer should be pretty sturdy. As you did in step 22, lightly pencil in where any pieces touching the front board will go. Make sure you’ve make marks on both sides. Then, line it up, clamp the main part of the organizer in place, and tap your final nails through the front board, finishing the main body of the project.
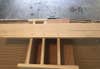
26. Trace the sections onto the lauan. Now it’s time to put the lauan and the poplar together. Arrange the poplar structure on top of the lauan exactly as you’ll want it to look in the drawer. Then, take the lauan out from under the poplar and put it on top. Now, flip everything over so the lauan is on the bottom again. Use your pencil to trace the poplar structure onto the underside of the lauan. Mark where you’d like the nails to go, too, if you’d like.
27. Nail the lauan to the poplar. Lay the lauan on your work surface so the tracings are underneath and place the poplar structure on top of it. Flip everything over so you can see the tracings and the lauan is on top. Taking extra care to make sure everything is lined up properly, tap the nails into the lauan, about 4-5 inches apart along each poplar divider. That measurement doesn’t have to be exact: you really want one nail at each end of each divider and one or two in the middle for longer poplar pieces.
28. Insert your divider into the drawer. Now that everything’s fastened, slide your custom kitchen drawer organizer into your empty drawer, pressing down on the lauan to make sure it goes completely to the bottom of the space.
Now that you’ve done one, you can repeat the process for every drawer in your home. Each one will be better than the last, and they’ll all offer a unique organizational and puzzle-building challenge, if you’re into that. If you’re not, well, at least you don’t have a messy silverware drawer anymore.
