How Did the Apollo Command and Service Modules Separate?
The service module might have powered the Apollo missions, but it was never meant to return home. Instead, it was...
The service module might have powered the Apollo missions, but it was never meant to return home. Instead, it was the workhorse of the Apollo mission. It gave life to the nerve centre of the mission, the command module, and was unceremoniously cast off at the end of a flight and left to burn in the atmosphere.
The command module is the Apollo spacecraft we’re familiar with. It’s the gumdrop-shaped vehicle that served as the crew’s main quarters throughout the mission; the commander and lunar module pilot, of course, descended to the Moon’s surface in the lunar module. But it was small, just 10 feet 7 inches tall and 12 feet 10 inches in diameter. And even that small volume was divided into three sections. There was a forward compartment that served as the docking site with the lunar module, an area around the base that housed the reaction control system and all the related wiring and plumbing, and finally the main crew quarters that gave three men just 210 cubic feet of living space. But from this spacecraft the crew ran almost every aspect of the mission. Again, the exception was the lunar landing.
But the command module was far too small to carry everything the crew would need for the flight. It could hold necessities like food and waste management systems, but it couldn’t also hold consumables like oxygen, water, and fuel, not to mention an engine big enough to make course burns and the big transearth injection burn that would actually send the astronauts from the Moon back to Earth.
Spacecraft Mating
All this fell to the service module, the cylindrical spacecraft mated to the command module that fed the electrical, propulsion, and environmental systems for the bulk of the mission to the Moon. It was 12 feet 10 inches in diameter and 24.9 feet long divided into six sections around a central area. The central cylinder held the main Service Propulsion System engine and its associated plumbing while the six other sections held hydrogen-oxygen fuel cells, cryogenic oxygen tanks, and cryogenic hydrogen tanks, and all the subsystems for the reaction control system.
The command module was mated atop the service module, connected by three tension ties extending from the CM’s heat shield to six compression pads on the top of the SM. These ties were stainless straps 2.5 inches wide and 4 inches long bolted to the spacecraft on either end. But the shape and placement of the heat shield posed a bit of a challenge. Because it was bowed out slightly, the CM couldn’t sit flush against the SM. A 26 inch high fairing between the spacecraft left room for the heat shield as well as space radiators for the electrical power subsystem.
And also because of the heat shield, there was no way to connect the two spacecraft so the command module could feed off the service module through the life-saving heat shield. To get around this challenge — literally — an umbilical ran along the outside of the mated pair. Eighteen inches wide and 40 inches long, it held all the wiring and tubing that allowed power, water, oxygen, and water-glycol to flow between the two spacecraft.
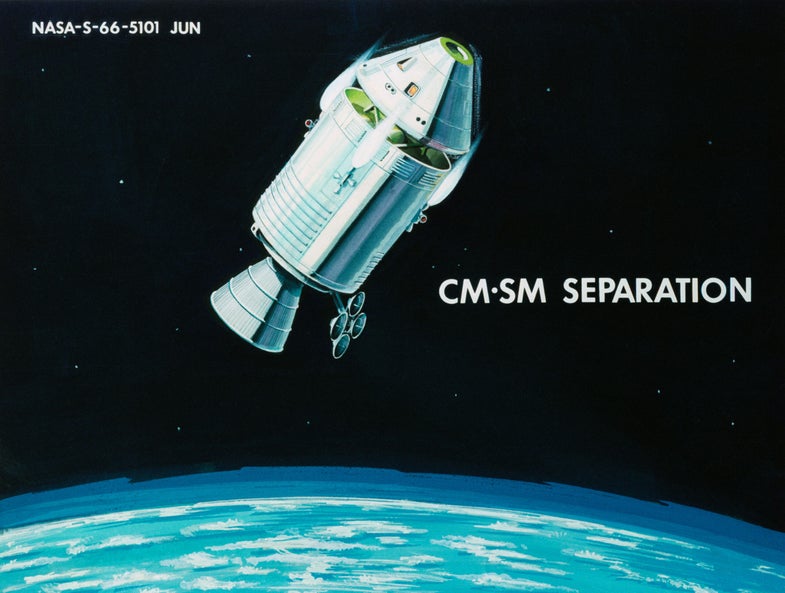
The service module was never intended to return to Earth; only the command module was aerodynamically designed to safely fall through the atmosphere. Just before reentry, the crew put the command module on its internal batteries then separated the CM from the SM. A guillotine mechanism with two stainless steel blades driven by redundant cord charges cut the wires and tubes in the umbilical, and small charges sever the tension ties. The umbilical firing pulls away and stayed attached to the service module, leaving the command module unhampered for its return to Earth. All the service modules were left to burn up in the atmosphere.
Sources: NASA CSM Fact Sheet; Apollo 11 at the NSSDC.