Midnight/Shot Review: A Pocket-Sized Infrared Camera
The Midnight/Shot offers one key feature--infrared photos and videos--that you won't find on your average point-and-shoot, or even your average DSLR
We may earn revenue from the products available on this page and participate in affiliate programs. Learn more ›
This may sound like a high-school science lesson, but to understand how the Midnight/Shot IR camera takes its eerie and beautiful shots, you must first understand what exactly infrared light is. Stay with us. (Please.) Because that understanding is key to appreciating that this little $150 camera can take photos most $3,000 DSLRs can’t.
What’s New
So, the lesson: The longest wavelength of light that is visible to the naked human eye is red. Infrared light is essentially electromagnetic radiation that is at a wavelength slightly longer than that of visible light. That slightly longer wavelength makes infrared light invisible to the naked eye.
All digital cameras, including the Midnight/Shot, contain a filter, generally located in front of the sensor, that blocks out all infrared light—without this filter, digital images would have a pink fuzz around the edges, since digital sensors are very sensitive to IR and the different wavelength would cause the lens to focus at a different point. However, in its “IR mode,” the Midnight/Shot removes that infrared filter from the light path. It avoids the pink fuzz problem by using exclusively black and white for IR photos, and by being a relatively low-resolution camera to begin with. (This version of IR is different than the “heat map” photos, like this cup of coffee, that we sometimes associate with IR photography. Those are actually taken with thermographic cameras–heat emits IR, yes, but in a longer wavelength than the one the Midnight/Shot sees.)
Science lesson over (and it wasn’t so bad, right?).
So why is infrared photography so cool? It allows us to see a world that is ordinarily completely invisible to us. Plus, it makes photos look really unusual and cool–contrast is dialed way up, with trees often seeming snow-white and the sky looking pitch-black, for example. IR photography isn’t new–in the old days of infrared photography, special IR-sensitive films were used. Unfortunately, the handling and processing of those films, in addition to the physical price of them, made IR photography out of reach for most photographers. But within recent years, many photographers have begun experimenting with the removal of that IR filter located in their digital cameras. In fact, there are quite a few services out there that will convert your camera for you (LifePixel being one of the largest). But as this conversion can cost nearly $500, it’s nowhere near worth it for someone who just wants to experiment with this very unusual branch of photography.
Enter the $150 Midnight/Shot, a tiny, solid-feeling (if plasticky) compact camera, boasting a roomy 3-inch LCD, a 5MP CMOS sensor and the ability to shoot authentic infrared images–you can even shoot infrared video at 640x480p–all for $150. To trigger the IR mode, you actually twist a little grooved ring around the lens to physically move the IR filter away from the lens.
The main difference between the Midnight/Shot IR camera and an expensive DSLR converted for IR photography is that the DSLR captures only infrared light, thanks to the filter placed in front of the sensor that blocks nearly all wavelengths except for the infrared ones. The Midnight/Shot, on the other hand, allows for all spectrums of light to flood the sensor–not just infrared, but also all visible light. Without the insertion of an additional filter to block out the other wavelengths, the Midnight/Shot is no different than a point and shoot with a busted IR-blocking filter—essentially a full-spectrum camera.
Check out some sample shots from the Midnight/Shot camera.
What’s Good
We brought the Midnight/Shot along with us to a nighttime concert in Central Park to see how it’d fare. The results were, to our surprise, pretty impressive. The instructions do state that at night, the subject must be within nine feet of the camera. That’s because at night, with the absence of light (including infrared light), you’ll need to use the camera’s little IR flashlight, located just above the lens, to provide your own (invisible to the naked eye) IR light. Without the flashlight, taking photos in a dark room would result in a black picture. In the daytime, you don’t have to worry about that, but we did end up with several completely dark images, due to our negligence in reading the instructions. The flashlight generally does a better, or at least more dramatic, job of exploiting the “IR look” of photos than just using regular sunlight.
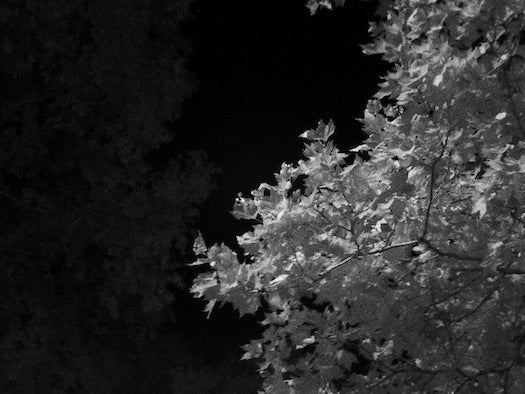
Still, we came home with a few winners–all in black-and-white, since the camera only shoots infrared in monochrome (it shoots in color when not in IR mode). You will notice that the IR-effect tends to give foliage and anything with chlorophyll an eerie white glow. This is because chlorophyll is known to reflect IR light back more than just about any other surface, which means any kind of greenery is going to give a particularly strong image. The IR effect is very particular–it looks almost like some sort of digital aftereffect, except even more unearthly. It’s not going to be ideal in every situation, but we did find it to be a very fun toy to play around with–“how’s that going to look in IR? How about that?”
However, the true genius of this inexpensive camera is revealed when the lights are turned off. Thanks to the IR flashlight located above the lens, the Midnight/Shot is able to see in complete darkness—something an expensive IR-converted DSLR can’t do. While the manufacturer claims that the beam is capable of illuminating objects shrouded in blackness up to eight feet away, our tests showed the beam’s limit is more like six feet. For the best results, we recommend being no more than 3 feet away from your subject. Here’s what we mean:

Night Vision With the Midnight/Shot
The camera itself feels sort of like a cheap-ish knockoff of the Canon S95—pretty much the top compact camera in the game right now—which means it’s a thin, minimalistic black design, very businesslike, with no more buttons than necessary. It’s very easy to use, once you figure out how to activate IR mode, which is of course what you’ll mostly be doing with it.
What’s Bad
It is still a basically no-name-brand $150 point-and-shoot, and one with middling specs at that, so in terms of performance, it’s not exactly the most impressive camera you can buy. It does feel pretty cheap, though not necessarily fragile–it’s very plasticky, but it doesn’t feel as if it’s liable to fall apart. We could probably pick apart its specs and shooting options, but that’s really missing the point of the camera.

The Midnight/Shot IR Camera
The Price
$150 at ThinkGeek, which we think is a totally fair price. Cheap, even.
The Verdict
If you’re looking for a new all-purpose point-and-shoot, forget about the Midnight/Shot. It’s not for you. But for photography geeks and the generally curious, this is a really fun toy. You can replicate the effect in Photoshop, mostly–though not without some very significant time figuring out all the particular light and contrast settings–but we really liked playing with real IR photography, seeing how different objects and scenes would react with the filterless camera. The night vision mode, as expected from the camera’s marketing, was one of the most fun features–it really does see in the dark, to a limited extent, and in our time with the camera, the feature didn’t even start to get old. It’s inessential, but definitely fun.

Blueberries, Hold the Blue

Tree Shot

Crowd Shot With Rain

In the Subway
Tree Shot at Night

Lincoln Tunnel

Side-by-Side: IR vs. Color