Five map and compass skills every outdoorsman should master
How to master the art of finding your way home.
This story originally appeared on fieldandstream.com.
In the movie Pirates of the Caribbean, as you may remember, Johnny Depp’s character, Capt. Jack Sparrow, navigates with a magic compass whose needle points toward the object of the heart’s desire. Orienteering differs in that a topo map has contour lines in place of the galaxy imprinted on Sparrow’s compass, and the needle on a compass points to the magnetic pole of Earth. These tools can still lead you to the object of your heart’s desire—be that a lake teeming with brook trout or base camp after a day of tracking elk. But to harness the true magic of orienteering, you’ll have to master the skills here.
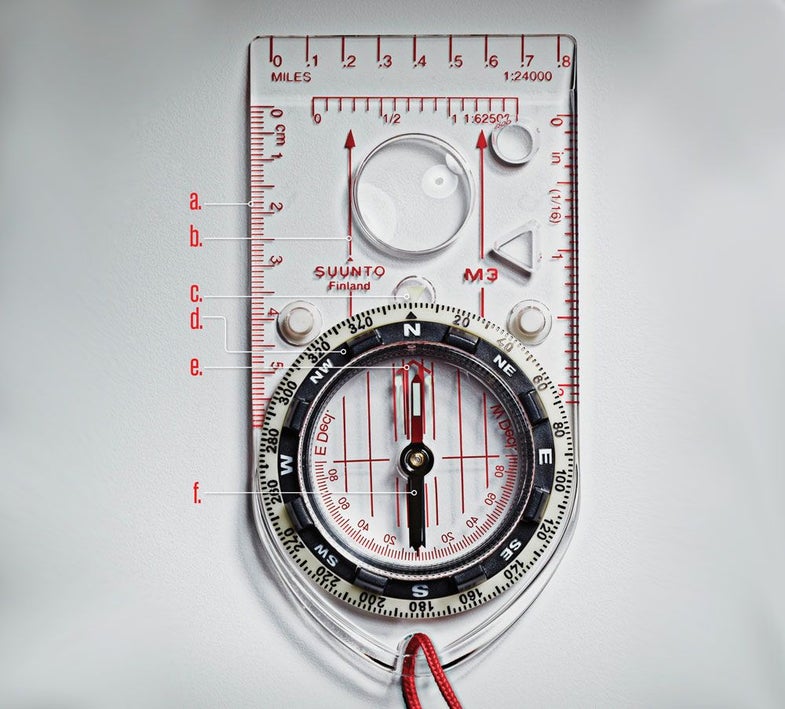
1. Decipher a Baseplate Compass
For orienteering, you need a baseplate compass, consisting of a rotating compass housing mounted on a flat, transparent base. If you don’t have a baseplate compass, buy one before reading further. Orienteering can sound complex, but by placing your own compass over the map illustrations and following these instructions, you’ll discover that it’s actually quite simple—and fun.
2. Read a Topographic Map
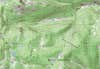
A topo map is an eagle’s-eye illustration of the land, with differences in elevation shown via contour lines. (Typically, every fifth line is darker and marked with the elevation.) These contours enable you to interpret a flat piece of paper in three dimensions. With practice, you will be able to see the country in relief, visualizing the rise and fall of the landforms. Map symbols, scale, and declination are keyed at the bottom of the map—they may vary slightly among different mapping systems.
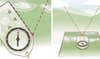
3. Take a Direct Bearing

If you can see a landmark, you can navigate toward it by taking a directional bearing. Here’s how:
Step 1: Hold the compass face up at chest level and point the direction-of-travel arrow at a landmark, such as a peak. (The compasses above are held upright to show the positions of the magnetic and orienting arrows more clearly.)
Step 2: Holding the compass still, turn the housing until the magnetic arrow rests inside the orienting arrow.
Step 3: Read the bearing in degrees at the bearing guide under the direction-of-travel arrow. Also note the back bearing, which is your forward bearing plus or minus 180 degrees. (For example, if the forward bearing is 60 degrees, the back bearing is 240 degrees. If the forward bearing is 220 degrees, the back bearing is 40 degrees.) Now if you get turned around, you can relocate your direction of travel by holding the compass and turning until the magnetic arrow is inside the orienting arrow.
RELATED: With GPS satellites whizzing overhead, who needs a compass anymore? Why, you do.
4. Plot a Course
Plotting a course with a map and compass enables you to navigate to a destination on the map that is not visible from your starting point.
Step 1: Orient the map with your compass. For example, if the direction you wish to travel lies north of your starting point, place the map so that the top, or northern end, is away from you with the red end of the magnetic needle facing away from you. Use the straight edge of your compass’s baseplate to draw a line between your position on the map and the destination you wish to reach. Extend the line along the map far enough to bisect a line of longitude. This will allow you to move the edge of the baseplate along the line so that you can align the orienting arrow directly over a longitudinal line, making it easier to record an accurate bearing, as described in Step 2.
Step 2: Keeping the baseplate firmly in position, turn the housing until the orienting arrow aligns parallel to one of the longitudinal lines, with the arrow pointing to the northern end of the map in our example. (If you have overlayed the map with lines that correct for declination, use those. If you have adjusted for declination by another method, use the longitude lines on the map.)
Step 3: Read your course at the bearing guide and jot it down. Note the back bearing. It will help when you reverse your steps.
Step 4: Holding your compass in your outstretched palm, turn your body until the magnetic needle lies exactly within the outline of the orienting arrow. Follow the direction-of-travel arrow.
5. Triangulate Position
If you can see two landmarks marked on a topo map, triangulation can fix your position on the map.
Step 1: Facing the landmarks, set your map on a flat surface. Place your compass on the map and turn the map until the longitude lines point north. This orients your map with your compass. Take a direct bearing on one landmark. Next, align the baseplate edge on the mapped landmark and rotate the entire compass until the magnetic arrow rests inside the orienting arrow. Draw a line from the landmark toward yourself.
Step 2: Repeat procedure with the second landmark. Your position is where the lines cross.