Build a portable password generator
Convert an AVR development board into Pass Key—a handy-dandy password maker.
PINs, passwords, secure entry systems; just about everything you access these days needs some form of passive authentication code. Heck, even that WiFi router in your basement uses a mega 63-character password for enabling secure access. Before you know it, you’ll even need a password just to go to bed at night.
More often than not, these security code systems require you to enter a lengthy eight-or-more-digit alphanumeric sequence. And creating powerful, unique, protective passwords can be a tough challenge for most people. What you need is some sort of portable, automatic, press-the-button-and-read-the-password device. Pass Key is an attempt at satisfying this requirement.
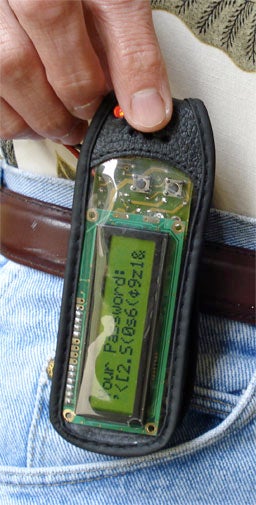
Built from a modified AVR development board manufactured by Olimex, Pass Key is a sweet little 5-volt “candy bar” style computer that can generate 16-digit alphanumeric passwords as fast as you can press a button. Yes, the original AVR-MT dev board requires 10 to 14 volts, but with a little circuitry magic, this power demand can be sliced to a scant 5 volts without losing any of the display, buzzer, LED, button, or computational capabilities of the original dev board.
- Note: Before you begin building your Pass Key, please refer to the related articles linked to this project. These previous projects will show you how to build an Olimex AVR programmer and how to construct a simple 5-volt power supply that is ideal for operating your Pass Key.
Furthermore, the code for Pass Key has been written with BASCOM-AVR. BASCOM-AVR is an incredibly powerful Windows-based BASIC compiler that can help you program AVR microcontrollers just as competently as your assembly and C brethren (and sisters, too).
Just like the more popular assembly- and C-based programming environments, BASCOM-AVR generates a sweet, tight HEX code that can be independently uploaded with any USB AVR programmer or directly burned onto an AVR with Atmel’s STK500 and a serial COM port.
- Note: If you own an AVRISP mkII USB programmer, you can still use BASCOM-AVR for developing your code. Rather than using BASCOM-AVR for programming your microcontroller, however, you will compile a HEX code for your BASIC program, then burn the HEX code into the microcontroller with Atmel’s Studio 4 IDE.
We’ve included both the Pass Key BASCOM-AVR code, as well as a demo BASCOM-AVR program for the stock AVR-MT dev board. Both of these programs can be downloaded, compiled within the BASCOM-AVR IDE, and programmed on the ATtiny2313 microcontroller on your Olimex AVR-MT dev board.
Stats
- Time: 2 hours
- Cost: $43.01
- Difficulty: moderate
Parts
- Olimex AVR-MT development board (SparkFun Electronics #DEV-00038; $38.95)
- Atmel ATtiny2313 (SparkFun Electronics #COM-00212; $2.88)
- Amp 2-pin header (Mouser #571-111237232; $0.28)
- Amp 2-pin housing (Mouser #571-111237222; $0.14)
- 2 Amp contacts (Mouser #571-11237212; $0.26)
- Leather case (All Electronics #CSE-29; $0.50)
- 2 short lengths of scrap wire (salvaged; free)
Instructions
1. Convert the AVR-MT dev board to 5-volt power. Carefully remove the following components from the dev board: D1, C3, C1, VR, and PWR.
2. Add two jumpers. Cut the short lengths of scrap wire to approximately a half-inch long, strip off some insulation from each end, and bend each wire into a “U” shape. Carefully solder the first jumper between the two pins of the previously removed component: D1. Next, solder the second jumper between the input and output pins of the previously removed component: VR. These pins are the two outside pins of the three-pin VR.
3. Add the header. Solder the header into pins 2 and 3 of the previously removed component: PWR. Pins 2 and 3 are the right pin and the furthest back pin, respectively. Pin 2 is GND and pin 3 is the +5-volt (+) pin. Remember this Amp header is a polarized receptacle. Keep this orientation in mind for properly mating this header with the power plug from your 5-volt power supply.
- Note: The Amp housing and contacts are used for mating your 5-volt power supply with the dev board’s new power receptacle.
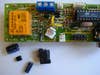
4. Insert the ATtiny2313 microcontroller. Press the microcontroller into the 20-pin IC socket on the AVR-MT dev board. Plug your 5-volt power supply into the dev board.
5. Download the BASCOM-AVR MVR-MT Demo program. Download the Demo program, create a HEX file with BASCOM-AVR, and burn this file onto the AVR-MT board with Atmel Studio 4 and your AVR programmer. Remember to turn on the 5-volt power supply prior to connecting the AVR programmer.
6. Run the Demo program. Ensure that the Demo program properly lights the LED, activates the LCD, and plays “Here Come the Saints” on the AVR-MT buzzer. This step will verify that your 5-volt power conversion is functioning correctly.
7. Load the Pass Key code. Once the Demo program checks out, download the Pass Key program, create a HEX file in BASCOM-AVR, and burn this file on the AVR-MT dev board.
8. Generate a password. Following the opening credits, Pass Key will generate a 16-character alphanumeric password for every press of button No. 4. If you feel snoopy eyes scoping your Pass Key, you can toggle the display on and off with button No. 1. Additionally, there are comments in the Pass Key code for enabling other buttons on the dev board and adding your own code for saving your generated passwords.
- Note: The random numbers in BASCOM-AVR are generated by the compiler. Therefore, the “random” sequence will be the same every time the Pass Key program is executed. If you don’t like this rote repetition, you can modify the program like this:
- Dimension a different random number seed value
- Change the length of the generated password
- Remove or exclude the use of special characters (e.g., #, !, ~, etc.) in the password
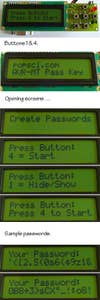
If a 16-character password is not to your liking, then modify the code for enabling different password lengths via different dev board button presses. Now slip Pass Key inside its leather case and head smartly off to any security encrypted destination. By using Pass Key, your password prowess should be much more robust, which should help you get a better night’s sleep. Good night, Pass Key.