The Peltier-powered self-cooling coolie
Keep cans cold in the car with repurposed PC parts.
Peltier junctions are amazing little devices that look like oversize Chiclets and use electric current and semiconductors to move heat to one side, leaving the other cold. They’re typically used to cool PCs in which the main processor has been overclocked to run faster (and, consequently, hotter) than the manufacturer intended—a popular hack among hardcore gamers.
- Dept: DIY
- Tech: Peltier junctions
- Cost: $66
- Time: 1 hour
- Difficulty: dabbler | | | | | master (Editor’s note: 2/5)
I’m not really into the overclocking scene, but Peltiers fascinate me. I recently picked one up just to play with it and thought, What could I cool with this?
“Mmmm… beer,” my inner Homer Simpson replied.
So with some epoxy and a heat fan, I hacked together a quick prototype of a Peltier-cooled metal stein. It worked, but required a large 12-volt power supply that had to be plugged into the wall. That’s fine for geek parties, but I wanted something nominally more useful. Realizing that my car has a great 12-volt power source (the cigarette lighter outlet), I modified the design and ended up with a coolie that can keep a standard 12-ounce can (of soda, of course) at a perfect chill indefinitely.
Yes, I know you can buy in-car devices that can cool a whole six-pack or heat a bowl of ramen noodles—and that’s fine, if shopping is your thing. Me, I like to build. If you do too, here are the basic directions, and see “Mods” (below) for design alternatives.
The parts list
- 1 (12-volt) Peltier junction (also called a thermoelectric device): $25
- Can coolie: $1
- Cigarette lighter plug with 5-amp fuse: $4
- 2 to 3 feet of two-conductor, insulated, 18-gauge wire: $5 per spool
- Small 12-volt CPU or GPU cooling fan and heat sink: $10
- One square foot of aluminum foil: $1 per roll
- Tube of silver-based epoxy: $15
- Heat-shrinkable tubing or electrical tape: $3
- Nylon tie wraps: $2
- Total cost: $66
Building the coolie
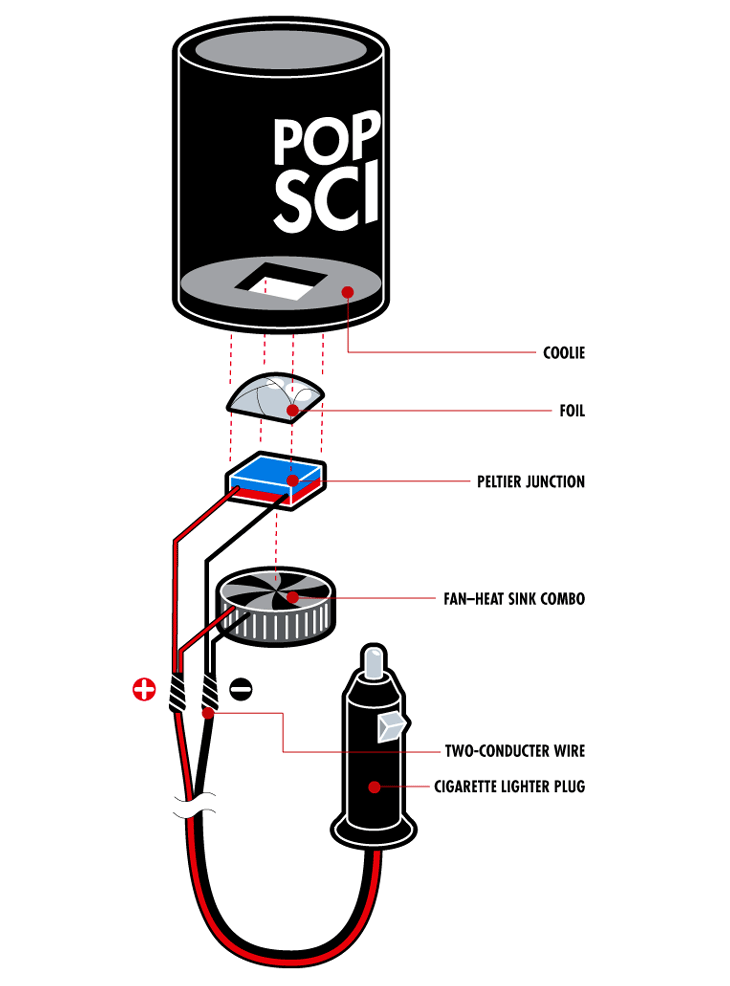
1. Wad the foil as tightly as possible into the base of a soda can.
2. Temporarily connect the Peltier junction to your cigarette lighter plug (see Step 4 for connections) and power it up to figure out which side is cold and which is hot.
3. Flatten the other side of the foil ball and attach it to the cool side of the Peltier with silver epoxy.
4. Solder the wires on the cigarette lighter plug to the two-conductor wire to extend its length, and connect the other end to the Peltier junction: plus (+) wire to the Peltier’s red wire; minus (-) wire to the black Peltier wire.
5. Use the silver epoxy to glue the fan-heat sink combo to the warm side of the Peltier device (with the fan blowing down). Wait for the epoxy to set, then connect the fan wires to the Peltier wires in parallel: red to red, black to black. Cover the exposed connections.
6. Cut a hole in the bottom of the coolie just large enough to fit the foil ball. Push it in far enough to completely contact the bottom of a can placed in the holder. Cut two small holes near the bottom and connect the stack with tie wraps.
Mods
- Try cooling from the side instead of the bottom. Just shape the foil to fit the curve of the can and carve a hole in the side of the coolie to hold the cooling stack.
- Try multiple Peltier junctions to increase the chilling ability. You’ll need a 10-amp fuse in the cigarette lighter plug, and make sure all your Peltiers together don’t draw more than about 100 watts.
This story has been updated. It was originally featured in the September 2004 issue of Popular Science magazine.